Go Back  Quiltingboard Forums >
  • Pictures
  • Hexi Project--Stick a fork in it, it is Done! >
  • Hexi Project--Stick a fork in it, it is Done!

  • Hexi Project--Stick a fork in it, it is Done!

    Thread Tools
     
    Old 01-15-2018, 07:35 AM
      #1  
    Super Member
    Thread Starter
     
    Join Date: Jan 2012
    Location: NE Missouri
    Posts: 6,418
    Default Hexi Project--Stick a fork in it, it is Done!

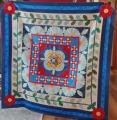
    [ATTACH=CONFIG]587108[/ATTACH]A challenge to myself. Do it all by hand from start to finished top. Little did I know when I started about 4 years ago, that it would take this long. I had never heard of La Pass, otherwise I would have devoted my time to that. To be fair, I didn't work on it except for evenings until the past two weeks when I saw the end in sight. It measures 96x96 on the widest part. I learned a lot about color. Didn't have a clue when I started and now I would do differently. Especially buy more ombre fabric. Didn't have a pattern just a photo on the internet, had never worked with hexis exclusively. Has anyone bound this sort of project maintaining the integrity of the hexagons? Any worthwhile tips because it took two hours just to staystitch around this critter before taking to the hand quilter. [ATTACH=CONFIG]587109[/ATTACH]
    Attached Thumbnails img_1551.jpg   img_1548.jpg  
    Quilter 65 is offline  
    Old 01-15-2018, 08:09 AM
      #2  
    Senior Member
     
    Join Date: Jan 2013
    Location: Central Florida
    Posts: 794
    Default

    Wow...that's a lot of work and a beautiful end product. No idea how to bind maintaining angles on edge hexis (birth method would have needed to be done before getting ready for hand quilter).
    Chasezzz is offline  
    Old 01-15-2018, 08:19 AM
      #3  
    Power Poster
     
    JuneBillie's Avatar
     
    Join Date: Jun 2011
    Location: In God's Kingdom in Tennessee
    Posts: 12,726
    Default

    Your quilt is so beautiful, and you sure put in a lot of fine work on it. Thank you for sharing it with us.
    JuneBillie is offline  
    Old 01-15-2018, 08:19 AM
      #4  
    Super Member
     
    givio's Avatar
     
    Join Date: Jul 2013
    Location: Michigan
    Posts: 2,751
    Default

    You could still add background triangles after it's quilted-- at least that would make fewer Y areas on the bound edge...
    givio is offline  
    Old 01-15-2018, 08:42 AM
      #5  
    Power Poster
     
    Join Date: Apr 2010
    Location: Long Island
    Posts: 24,820
    Default

    I've appliqued the end to a straight piece of fabric. also on another one, i just folded the edges over and met them and sewed by hand the outer edges.
    lynnie is offline  
    Old 01-15-2018, 10:28 AM
      #6  
    Super Member
     
    Join Date: Mar 2010
    Location: Ridgefield WA
    Posts: 7,765
    Default

    Here's tutorial by Marci Baker:

    https://www.youtube.com/watch?v=lwPe_84GBfY&t=14s

    Sorry, not supposed to be under lynie's!!

    Last edited by Kitsie; 01-15-2018 at 10:30 AM. Reason: put in wrong place.
    Kitsie is offline  
    Old 01-15-2018, 11:02 AM
      #7  
    Power Poster
     
    Join Date: Mar 2011
    Location: Ontario, Canada
    Posts: 41,610
    Default

    Beautiful! Are you going to fill in the corners to make it square or leave it as a hexagon? You can use more hexagons and lay them face down on top of the last row, machine sew the outside edge and turn them right side out and hand stitch the rest of the hexagon to the backing. You can also applique the whole hexagon to a white or pink background to make it square. You can lay the whole top upside down on the backing fabric and pillowcase the whole thing but that would be tricky.
    Tartan is offline  
    Old 01-15-2018, 11:21 AM
      #8  
    Senior Member
     
    Join Date: Apr 2017
    Location: Buckinghamshire, England
    Posts: 628
    Default

    I hand stitched it all to a piece of fabric when I did a similar 2 Year project. It was my first ever attempt at any form of quilting and I didn't Know anything about binding though so that bit is/ was a mess
    RJLinkletter is offline  
    Old 01-15-2018, 11:28 AM
      #9  
    Senior Member
     
    Join Date: Apr 2017
    Location: Buckinghamshire, England
    Posts: 628
    Default

    Here is mine
    Attached Thumbnails bbd54493-647d-4774-aa1e-a4d7a8ee5aac.jpeg  
    RJLinkletter is offline  
    Old 01-15-2018, 11:39 AM
      #10  
    Member
     
    Join Date: Mar 2015
    Posts: 16
    Default

    I have a scrappy grandmothers flower garden from the 1940’s I believe. Each flower is attached to the next flower with a ring of tiny green diamonds. The quilt is finished with a narrow handmade bias in the in same green as the diamonds. Very dainty. If I knew how to post a picture I would.
    Pique is offline  
    Related Topics
    Thread
    Thread Starter
    Forum
    Replies
    Last Post
    Quilter 65
    Pictures
    12
    11-09-2013 04:02 PM
    Caroline S
    Main
    3
    03-20-2012 08:38 PM
    MisBehavin'
    Introduce Yourself
    28
    07-16-2011 07:35 PM
    p38flygirl
    Main
    2
    03-23-2011 04:21 AM
    0tis
    Main
    5
    09-11-2010 07:13 AM

    Posting Rules
    You may not post new threads
    You may not post replies
    You may not post attachments
    You may not edit your posts

    BB code is On
    Smilies are On
    [IMG] code is On
    HTML code is On
    Trackbacks are Off
    Pingbacks are Off
    Refbacks are Off


    FREE Quilting Newsletter